

Octane Basics
Universal Material Build Guide
Version 1.0, Updated September 2022 using Octane 2022.1
Universal Material Build Guide
Version 1.0, Updated September 2022 using Octane 2022.1
About This Guide
This guide explains what the Universal Material is, and how to think through building any kind of material in Octane using it. This is meant to complement the updated Universal Material guide, which now serves as a deep dive into all the channels.
Part I is an introduction to the Universal Material, and how to work with the channel attributes.
Part II is a series of nine questions to ask that will guide you through building various types of materials from scratch.
Downloads
A c4d file containing a shaderball and various materials created using the universal material can be 📥 downloaded here. A full writeup and images of all the materials can be found here.
Part I: Introduction

Octane has several different types of materials, all of which can be accessed from the Live Viewer window under Materials>Create.
There are a lot of them, and most of them are still there for compatibility with scene files built in earlier versions of Octane.
The Universal Material is one of the more recent additions, and it replaces the need for just about every other material type in Octane moving forward.
You can convert most materials made with other types (Metallic, Glossy, Specular) to a Universal material by selecting it in the dropdown in the Basic tab of the material (or at the top left of the material properties in the node editor).
Channels
The most important thing to understand about materials in Octane (and most physically-based render systems for that matter) is that they are broken down into a stack of channels. Each channel describes a different property of the material (how reflective it is, how transparent it is, etc.).

Most of the different material types in Octane have a small subset of all the available channels, but the Universal Material has all of them (hence “universal”). This can be a little overwhelming at first, but as you get used to it, you’ll find it a lot easier to quickly build any type of material you want.
Important: turning off (unchecking) a channel in the Basic tab of the material does NOT remove the channel’s contribution, it simply hides the channel from the UI. If metallic was at 1, and you uncheck the Metallic channel in the basic tab, the material will stay at metallic=1 until you turn it back on and change the slider.
Channel Attributes

All channels have one or more attributes that describe how the channel behaves. Simple ones like Bump and Dispersion just have a single slider or texture input, while channels like Albedo and IOR are quite a bit more complex.
The UI across all channels usually boils down to three types of controls.
The Color Picker assigns a color to the channel’s contribution to the material. What the picker looks like depends on whether you have it set to Cinema 4D Native (shown above) or Octane Native (R, G and B sliders). This option is found in the Octane Settings, in the Settings tab, in the Other subtab.
The Float slider goes between two floating point values (numbers with a decimal point). It usually includes a field that you can type in exact values as well. Most of the time this slider goes between 0 and 1. 0 means black, or no contribution. 1 means white, or full contribution. Some channels like Dispersion and IOR have float sliders that go between minimum and maximum real world values, and some like Anisotropy even go to negative numbers.
The Texture Input allows you to hook another node up to the channel. This can either be a bitmap image (best nested in an ImageTexture node), or a procedural node like a noise or gradient.
Channel Attribute Hierarchy
The three attribute types exist in a hierarchy.
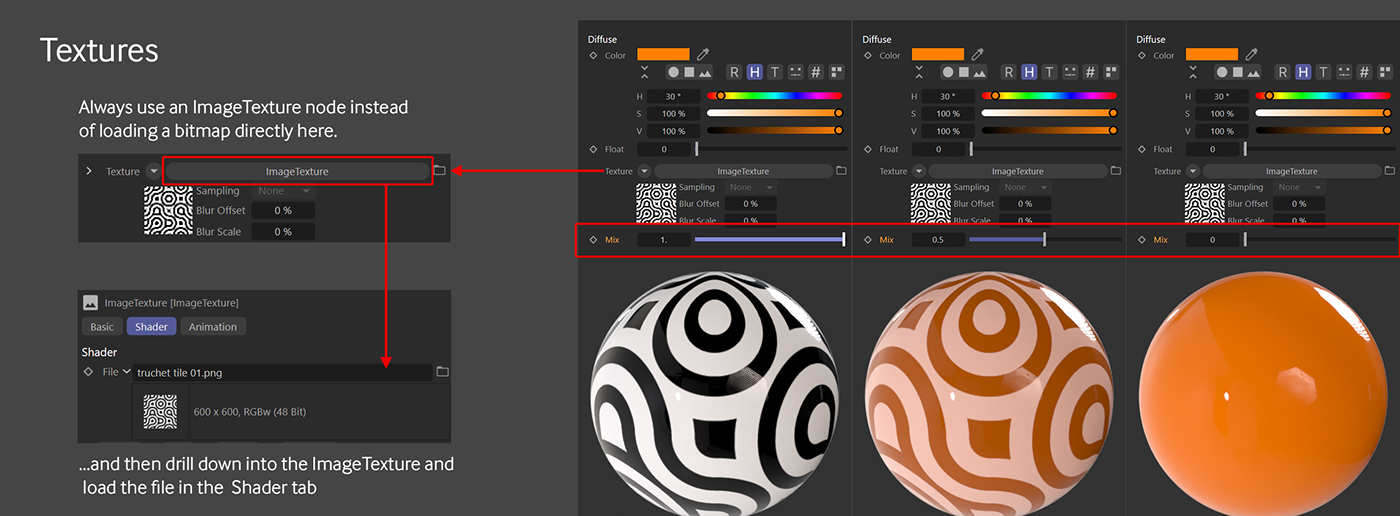
At the top of the hierarchy is the Texture Input. This will override the color and float inputs if something is fed into it. If the Texture Input section has a Mix slider, then you can do a simple blend (think Opacity slider in Photoshop) between the texture and the color or float under it. For more complex mixing and layering, check out this guide.
Below the Texture in the hierarchy is the Color Picker. The picker is overridden by the texture, but it overrides the Float value.
Bottom of the list is the Float value, and this is where things can be confusing.

If there’s no texture input, and the color picker is set to 0,0,0 (or #000000, or the equivalent of pure black in whatever mode you’re in), then the Float slider acts as a 0-1 grayscale slider with 0 being black, and 1 being pure white.
If the Color Picker is set to ANYTHING other than black, or there’s a texture input, the float slider will do absolutely nothing. There’s no blending between the Color Picker and the Float value - it’s an either/or situation.
Turning off the Channel’s Contribution
If the color picker is set to 0,0,0, the float is set to 0, and there’s no texture in the texture input, the channel has no contribution at all to the overall material. This is an important concept, because most of the time you are only going to want a few channels to have control over the properties of the material, and the rest need effectively be turned off to do this. Again, unchecking the channel in the basic tab doesn’t turn it off, so this is the only way to ensure a channel won’t muddy up your material.
Part II: How to Think Through Building a Material
Let’s take a look at nine questions that will determine how to build nearly any material. This is just an overview that will help you think about which channels to activate and mess with. For more information on what each of the channels actually do, check out the Universal Material Channel Deep Dive guide.
Step 1: Is the Material Metallic?

This is the very first decision you should make. The Metallic channel overrides nearly everything else, including Specular (glossy) and Transmission (glass). There may be a call for a material that’s semi-metallic, but more often than not it just makes the material murky and difficult to work with, so usually you want this slider either at 0 (not metallic) or 1 (metallic).
After you’ve determined that you want a metal, you’ll want to color it and control how reflective it is. This is determined by the IOR type. Artistic is the default, and easiest to use. The other two types are great when you have real-world values for a particular metal.
The Roughness, Anisotropy and either Albedo or IOR channels (depending on the IOR type) are used to adjust the look of a metallic material.
The BRDF model makes a large difference when roughness and/or anisotropy is involved. GGX (Energy Preserving) usually produces the best results in this case.
Step 2: Is the Material Opaque, But Not Metallic?

Matte and glossy materials include wood, plaster, opaque plastic, fabric, etc.
For these types of materials, make sure the Metallic Channel is set to have no contribution (metallic=0). Then adjust the Albedo and Specular channels to determine the color, pattern, and how glossy the material is.
If you’re making a fully matte material, set the Specular to 0,0,0, float 0. The float of 0 is important - it defaults to 1, so if you’re not used to checking it, you may end up changing the color to black and still wonder why the material is glossy.
If you’re making a glossy material, the IOR (Dielectric), Roughness and Anisotropy channels will control the look of the reflection.
Step 3: Is the Material Emissive?

Does it generate light? If so, bring the Albedo, Metallic, and Specular channels to 0,0,0, and make sure the floats are also at 0. Those channels can muck up emissive materials, and most of the time you want them to have no contribution at all.
After that, decide whether you want Texture or Blackbody type emission and then add one of those methods (in the form of a node) and adjust their settings in the Emission channel.
Emissive materials in Octane usually look pretty nice with Bloom/Glare, so be sure to set that up in the Camera Imager. You can also use the Saturate to White option to make neon look right.
Add a Coating (Step 9) or embed the object with the emissive material in another piece of geometry with a glass texture if you’re trying to make a lightbulb or something similar.
Step 4: Is the Material Translucent?

Will your material be glass or semi translucent plastic or wax or water or something like that? Set the Albedo, Specular and Metallic channels to 0,0,0, float 0 so they don’t contribute and muddy up the translucency, and give the Transmission channel a color (start with white).
If you’re after a clear material like glass or water, set the Transmission type to Specular in the Transmission channel, and then control the look with the Transmission, IOR (Dielectric section), and Dispersion channels.
If it’s more like a semi-translucent plastic or jade or wax, set the Transmission type to Diffuse, and then add a Scattering or Random Walk Medium in the Medium channel to control the scattering.
For a soap bubble or blown glass, use Thin Wall. For leaves, lampshades, and the like, use Thin Wall (Diffuse).
Step 5: Does it Need a Medium?

The Medium Channel works in conjunction with the Transmission channel to create Subsurface Scattering and Absorption effects. These are good for plastics, liquids, skin, and anything else that’s semi translucent. Scattering in particular really beats on the GPU, so make sure you absolutely need these effects and your scene will show them off.
Step 6: Are Textures Needed?

Now that the type of material is set, determine whether it has a completely smooth, uniform surface, or if one or several of the channels need to be broken up to add detail and variation across the surface. Textures can either be bitmap images loaded from disk, or procedurally generated via Octane’s nodes (noise, etc.). Remember to use ImageTexture nodes for bitmap images.
Step 7: Does The Surface Have Depth?

The Bump, Normal, and Displacement channels all determine whether the surface of the object the material is applied to either fakes depth (Bump/Normal) or has actual depth (Displacement). This is covered in more detail in the Channel Deep Dive guide.
Even more info on Normal maps can be found here.
Displacement is tricky and is dependent on a lot of things to work properly. Two entire guides have been written just go over this (part I here, part II here), and there was even a need for a dedicated guide on troubleshooting displacement.
Step 8: Are Any Special Effects Needed?

The Opacity, Thin Film, and Round Edges channels produce specific effects on the material or geometry.
Opacity is for fade in/out effects like a transporter, holes in a thin surface like paper, or intangible objects like a hologram. It is NOT for glass - that’s what the Transmission channel is for.
Thin Film is responsible for iridescence, and works best with metallic or very glossy non-metals.
Rounded Edges is a render-time effect that rounds sharp edges and is good for adding just a bit of realism to overly sharp geometry. Like bump, It doesn’t affect the silhouette, so it’s not great for closeups, but it can save some time and effort if you want to put a small bevel on otherwise perfectly sharp edges to catch the light a bit better.
Step 9: Does the Material Need a Top Coat?

The Sheen and Coating channels go over the top of everything else to give the material an extra glossy look or a fresnel-like sheen.
The Coating layer is a good separate reflection control for an emissive or SSS material where you don’t want to use Specular, and can also add a super high gloss look to a Specular type glass or a glossy plastic. Coating has its own roughness parameter as well.
Sheen is good for fabrics and other materials where the reflection falls off toward the areas of the object that you’re seeing flat-on. Sheen can take a texture input into its bump parameter to break the effect up (as seen above)
Step 10: Does the Material Need Layers?

The Universal Material supports Material Layers, which allows for composite materials (glass mixed with metal, or glossy mixed with emissive) without needing to use Octane’s Mix, Composite, or Layered type material. This requires knowledge of mixing and masking. More on this topic can be found in this guide.
Wrap Up and Links
This should get you started building your own materials. It takes practice and referencing back, but once you get the hang of it, it’s quick and easy.
Other Material-related Guides
🌐 Universal Material Starter Kit: 75+ Materials to help you understand and build your own Universal Materials
🌐 Intermediate: Mixing and Layering Deep Dive : Deep dive into mixing and layering nodes and materials
🌐 Intermediate: Mixing and Layering Stepthrough : Project-based approach to learning how to mix and layer materials
🌐 Advanced: Volumetrics Overview : Introduction to Volumetrics - first half covers scattering and absorption mediums
Author Notes
OG25 Universal Material Build Guide, version 1.0, Last modified September 2022.
This guide originally appeared on https://be.net/scottbenson and https://help.otoy.com/hc/en-us/articles/212549326-OctaneRender-for-CINEMA-4D-Cheatsheet
This guide originally appeared on https://be.net/scottbenson and https://help.otoy.com/hc/en-us/articles/212549326-OctaneRender-for-CINEMA-4D-Cheatsheet
All rights reserved.
The written guide may be distributed freely and can be used for personal or professional training, but not modified or sold. The assets distributed with in this guide are either generated specifically for this guide and released as cc0, or sourced from cc0 sites, so they may be used for any reason, personal or commercial.


